1

Your cart is empty.

Providing the best in Dreadlock Products, Tools & Accessories

19 Feb '18

How to get rid of head lice in Dreadlocks with Creeps Tincture from RAW ROOTs

RAW ROOTs Dreadlock Creeps Tincture (For Head Lice) is a natural head lice treatment made of Quassia Bark Extract, Organic Tea Tree, and Lemon Eucalyptus Oil. 

It's a very easy to use spray, with need no combing or washing. It is suitable for all hair types, including both natural hair and children's hair, but is especially suitable for dreadlocks. 

Directions - how to use the creeps tincture: 

  • Use disposable plastic gloves. 
  • Spray tincture all over the scalp. 
  • Make sure to cover the scalp completely with the tincture. 
  • The tincture can also be used to prevent lice, not just to treat them. 
  • To prevent lice, the tincture can be regularly applied in small doses. 
  • Give your scalp a nice little massage to make sure the tincture is distributed evenly. 
  • Cover with plastic film, or a disposable shower cap. 
  • Leave it for one hour. 
  • After one hour, remove the plastic film or shower cap. 
  • Simply let the tincture dry into your hair, or rinse with water. 
  • The treatment is done! And so are the lice! 
  • Repeat treatment after one week to make sure all eggs and nits are dead. 

05 Jun '15

It's a Wrap (head wrap) part 4: How to tie a head wrap, the Boho Turban way

Posted by Steve Green in a, boho, head, how, how to tie a head wrap, tie, to, turban, way, wrap

It's a Wrap (head wrap) part 4: How to tie a head wrap, the Boho Turban way

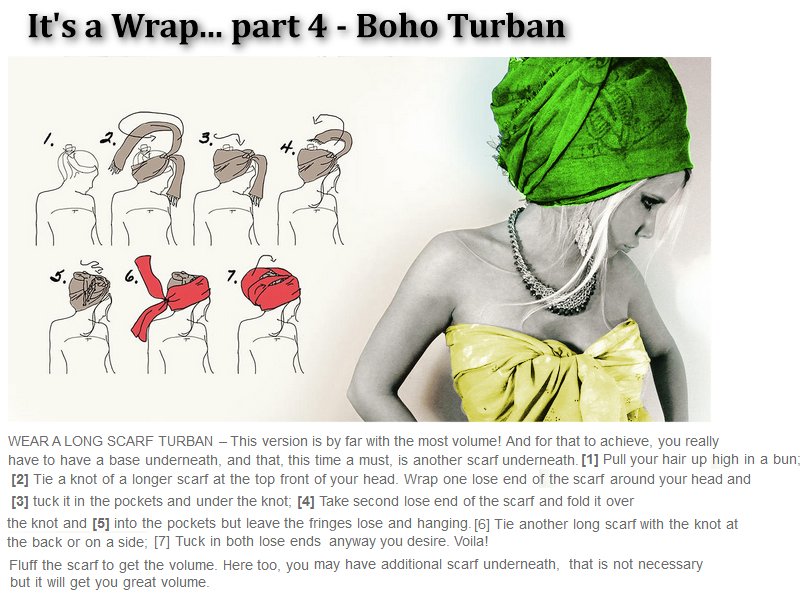
WEAR A LONG SCARF TURBAN - This version is by far with the most volume! And to achieve that, you really have to have a base underneath, and that, this time is a must, is another scarf underneath. 

  1. Pull your hair up high in a bun. 
  2. Tie a knot of a longer scarf at the top front of your head. Wrap one loose end of the scarf around your head. 
  3. Tuck it in the pockets under the knot. 
  4. Take the second loose end of the scarf and fold it over the knot. 
  5. Tuck the second loose end into the pockets but leave the fringes loose and hanging. 
  6. Tie another long scarf with the knot at the back or an a side. 
  7. Tuck in both loose ends anyway you desire.
  8. Voila! 
Fluff the scarf to get the volume. Here too, you may have additional scarf underneath, that is not necessary but it will get you great volume.
03 Jun '15

It's a Wrap (head wrap) part 3: How to tie a head wrap, Casual One Knot Style

Posted by Steve Green in a, casual, head, how, how to tie a head wrap, knot, one, style, tie, to, wrap

It's a Wrap (head wrap) part 3: How to tie a head wrap, Casual One Knot Style

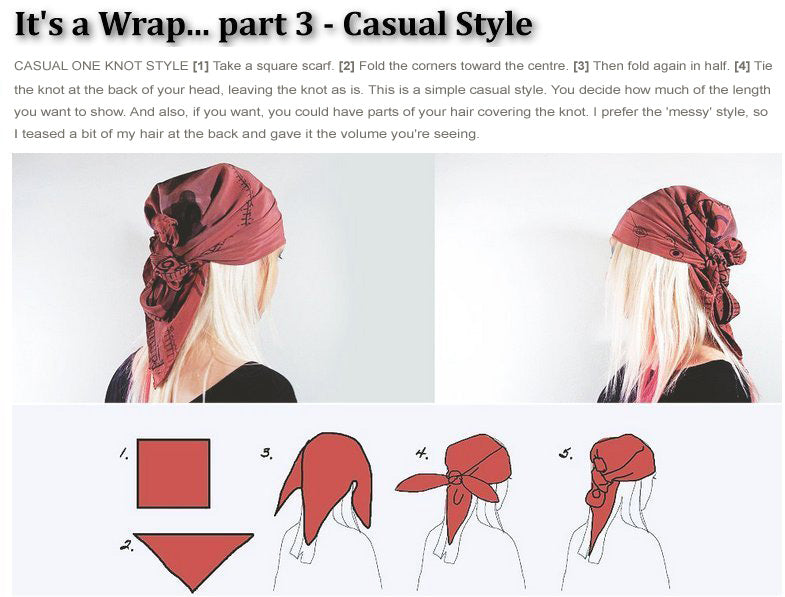
  1. Take a square scarf. 
  2. Fold the corners toward the centre. 
  3. Then fold again in half. 
  4. Tie the knot at the back of your head, leaving the knot as is. 

This is a simple casual style. You decide how much of the length you want to show. And also, if you want, you could have parts of your hair covering the knot. I prefer the 'messy' style, so I teased a bit of my hair at the back and gave it the volume you're seeing.

01 Jun '15

It's a Wrap (head wrap) part 2: How to tie a head wrap, the Gypsy Way

Posted by Steve Green in a, gypsy, head, how, how to tie a head wrap, tie, to, wrap

It's a Wrap (head wrap) part 2: How to tie a head wrap, the Gypsy Way

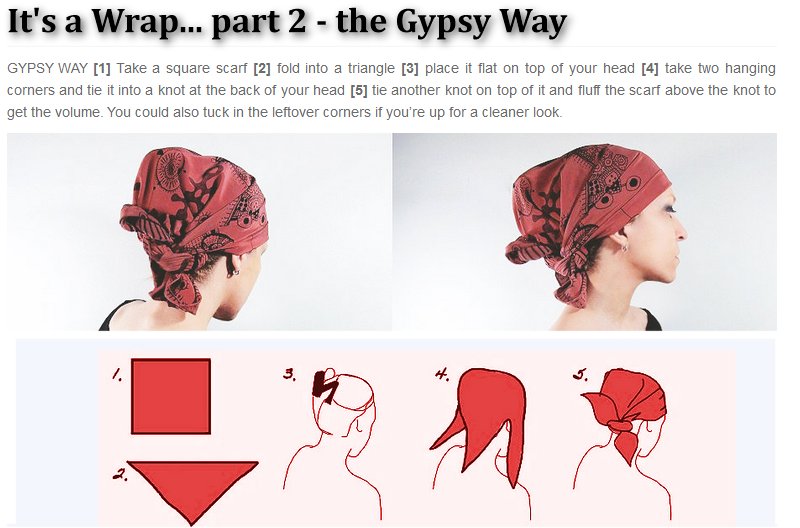
  1. Take a square scarf. 
  2. Fold the scarf into a triangle. 
  3. Place the triangle flat on top of your head. 
  4. Take to hanging corners and tie them into a knot at the back of your head. 
  5. Tie another knot on top of it and fluff the scarf above the knot to get the volume. 

You can also tuck in the leftover corners if you're up for a cleaner look.